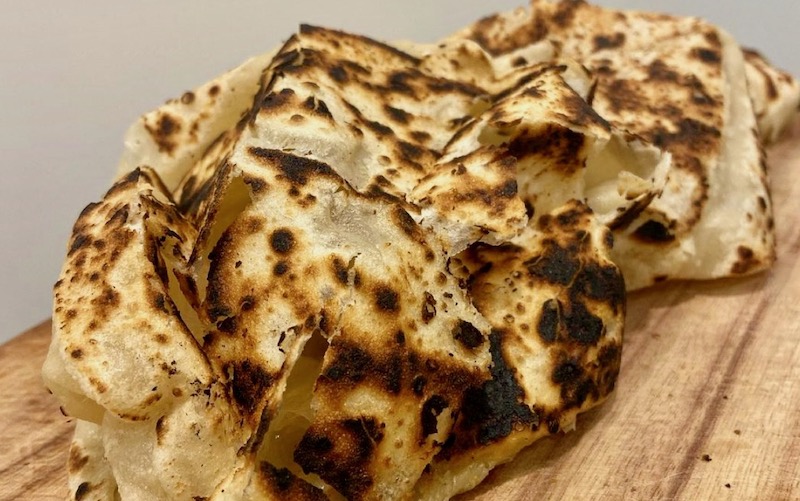
Roti chanai (also written roti canai and roti cane) is popular in India, Malaysia and Singapore (where it’s called roti prata). This flaky flatbread is an essential accompaniment to many curries, in fact it’s ideal for soaking up any sauces. My friend Simon Goh, founder of the Chinta Malaysian restaurants, has been making roti for over 30 years and he taught me the secrets to making flaky, fluffy roti chanai (see video below). Once you master roti dough, you can also create a wonderful meat-filled version called murtabak, a popular breakfast in Singapore’s Indian quarter, and egg-filled roti telur. Roti chanai dough is easy to make, it’s the shaping that takes a bit of practice, so it’s worth making a double batch of dough to have a few spare balls to practice on, and more roti to eat! Simon tells me that in Malaysia roti chanai is usually made with margarine or ghee, so use these, or vegetable oil, if you don’t have any butter handy.
Makes 2 pieces
Ingredients
1 cup plain (all-purpose) flour, plus extra for dusting (150g/5¼oz)
Pinch salt flakes, crushed
Pinch sugar
2 tablespoons milk (40ml)
1 tablespoon water (20ml)
Butter, for greasing
Vegetable oil, for greasing
Method
Combine flour, salt and sugar in a large mixing bowl and make a well in the centre.
Combine milk and water and gradually pour it into the well, working it into the flour with your hands to form a stiff dough. If it’s too dry, add a little more water a teaspoon at a time.
Knead in the bowl for about 5 minutes, until the dough leaves the sides of the bowl and is soft, smooth and elastic; “like Play-Doh”, Simon says.
Cover with plastic wrap and set aside in a warm place for at least 2 hours, or refrigerate overnight then remove it from fridge at least 30 minutes before shaping to allow it to return to room temperature.
Divide dough into 2 pieces.
Rub a little butter in the palms of your hands to melt it then pick up each ball and rub it to seal it with the butter; leaving just a little piece of butter on the outside of it if you like.
Place them on a plate and set aside for 2–3 hours (or cover and refrigerate overnight).
Rub a little oil onto a clean, dry worksurface (marble is ideal) and oil your hands as well.
Place a ball of dough in the centre and flatten it with your hands, pressing and pushing until it is a fine sheet, roughly rectangular and about the size of a large plate.
To get it really thin, pick up the sheet at the edge and flop it back onto the bench a few times; this takes a bit of practice. Keep gently stretching until the dough is translucent; it will look a bit messy at this stage and possibly even tear a little, that’s OK.
Sprinkle with a few drops of oil, fold each side in to form a neat square (see diagram), then fold each corner in to form an envelope shape (see diagram).
Heat a well-seasoned flat grill plate or large heavy-based pan until hot.
Working 1 at a time, place roti on the plate, folded side up, and fry for a minute or 2, until golden.
Then turn and fry the other side for a further minute or 2, until golden.
Remove from heat and quickly crush between your hands to fluff it up.
We made the pot-sticker dumplings and bang bang chicken from the Chinese class the other night. Once again both exceeded our expectations. My husband keeps saying it’s better than going out to restaurants as the recipes and quality are amazing.
Glennis (Caringbah South, NSW)
The whole Be Inspired experience has helped me love cooking again. I was sick of cooking the same old things - meal time is a lot brighter thanks to you Roberta.
Pam (Cammeray, NSW)
Your recipes are something I always feel confident offering guests and also reasonable in the time to prepare. We often try your recommended wines and suppliers and enjoy your travel tales too!
Jen (Tamarama, NSW)
Thank you for stocking our pantry with such authentic ingredients and quality produce. We really like the flexibility of cooking over a couple of days and changing the order we cook the dishes in when we want to. And I love listening to the themed playlist while cooking.
Katrina (Arncliffe, NSW)
I am absolutely loving Be Inspired! There are ingredients I have never worked with before so having the confidence to try something new is so much fun! The recipes are just amazing and the notes on what can be prep’d beforehand are a great help too. Thank you so much.
Deb (Belconnen, ACT)
Awesome fun traveling through Emilia-Romagna experiencing first hand some of the produce I've worked with over the last couple of years cooking with Roberta's classes – the family are reaping the benefits now.
Judith (Woronora, NSW)
Food, wine and travel! Three of my favourite things! Be Inspired with Roberta has been a wonderful experience and given me more confidence in the kitchen. I have learnt so much, cooked things I never would have attempted without Roberta’s excellent videos, and used ingredients I have never tried before.
Sandra (Garran, ACT)
I'm a competent cook whose learned so much from Roberta's online cooking classes. The recipes are yummy and Roberta’s video guidance offers so many little tips to improve flavour and organise the flow of preparation. I enjoy her warmth, sense of humour, and ability to giggle at herself when she occasionally messes up.
Subscribe To My Newsletter & Get A Free Online Italian Cooking Class (RRP $39)